Mini Cube (ATOM Matrix)
")
The Cube that we know and love actually has a younger brother – the mini Cube!
In the world of products and electronics, bigger is not always better – particularly if bigger is more expensive. The mini Cube (technically an ATOM MATRIX) gives up some features from its bigger Cube brother, but gains some substantial advantages by being smaller, lighter and cheaper whilst sacrificing the minimum number of features.
Often you will find once you’ve finished a prototype with the Cube that you want to cut the cost of the solution down – and many times your product can be built using a mini Cube, at a much lower cost (its roughly 1/4 the price of its big brother). For example, the Park Distance Warning System from the Applied Technology can be built just as effectively with the mini Cube.
The LED matrix of the mini Cube and the screen being a big clickable button, along with its built-in WiFi and Bluetooth communications features make this a highly versatile piece of programmable dynamite packaged in an itsy-bitsy little square!
Let’s take a quick look at how the mini Cube stacks up to the normal Cube
| Cube (Core2) | mini Cube (ATOM MATRIX) | |
|---|---|---|
| Colour graphics screen | Yes | No |
| Touch screen | Yes | No |
| Integrated Neopixel LEDs | 10 | 25 |
| Built-in battery | Yes | No |
| Speaker | Yes | No |
| Microphone | Yes | No |
| Vibration motor | Yes | No |
| Infrared transmitter | No | Yes |
| Accelerometer (tilt sensor) | Yes | Yes |
| Programmable Buttons | 3 capacitive touch | 1 physical |
| Grove ports | 3 | 1 |
| Expansion GPIO pins | 0 | 6 |
| CPU | 240MHz dual-core | 240MHz dual-core |
| RAM | 8MB | 0.5MB |
| Flash | 16MB | 4MB |
| WiFi | Yes | Yes |
| Bluetooth | Yes | Yes |
| Size | 54 x 54 x 24mm | 24 x 24 x 14mm |
| Weight | 101g | 3g |
Connecting the mini Cube
The mini Cube also connects to your computer using a USB cable, but it’s hardware uses a slightly different chip that enables serial communications to Windows over its USB port. This chip is natively supported on Windows 10, so you shouldn’t need to install drivers, but if you need to, you can download the drivers at the links below, then unzip and install them similarly to the process showing in the Applied Technology course video:
https://www.ftdichip.com/Drivers/CDM/CDM%20v2.12.36.4%20WHQL%20Certified.zip – for normal 64 bit Windows PCs
https://www.ftdichip.com/Drivers/CDM/CDM%20v2.12.36.4%20WHQL%20Certified.zip – for older 32 bit Windows PCs like the Mecer 2-in-1 tablets some learners have been previously issued
As usual, if you have hassles, drop us a line in the forum 👍
Modes
You may recall from the Cube that it supports several different modes – mainly a programming mode where you can re-program the Cube, and application mode where the Cube continually runs a specified application. On the normal Cube its pretty easy to see what mode you’re in and switch between modes because there is a big graphical touchscreen that shows a lot of visual information, and with which you can easily interact.
The mini Cube supports the same modes, but without a big screen its got a different way of switching between them …
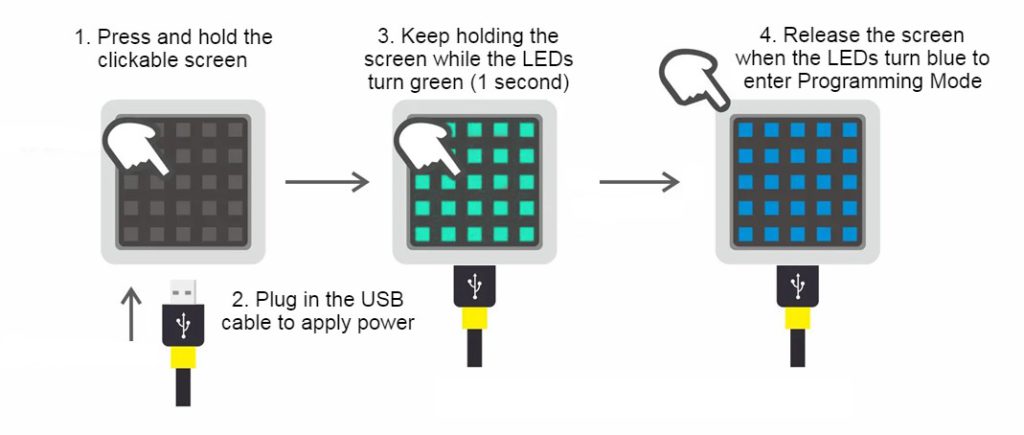
To switch between modes you need to be holding the clickable screen button down while applying power, and then watching the screen cycle through various colours until the colour matching the mode you want to be in appears – at which point you release the button.
For example, to enter programming mode, as shown below, press and hold the screen button, then apply power. The LEDs will light green for 1 second, then light blue for 1 second. While they are showing blue, release the button, and voila! your mini Cube is in programming mode, and you should see Connected in UIFlow once you’ve set the right COM port and Cube type. The mini Cube remembers the mode and will re-enter it each time if the screen is not clicked while power is applied.
The mini Cube cycles through the following modes in order:
- Green – Online programming mode (the mini Cube connects to the previously-configured WiFi network and can be programmed from flow.m5stack.com)
- Blue – UIFlow Programming mode
- Yellow – WiFi configuration mode
- Purple – Application mode – run the most recently downloaded program
Connecting to WiFi
Enter WiFi configuration mode using the method above and releasing the button when the LEDs glow yellow
The mini Cube will set up a hotspot called M5-XXXXXXX where XXXXXXX is its serial number.
Connect to this hotspot with a phone or computer (there is no password)
With a web browser navigate to http://192.168.4.1 to get a configuration web page from the mini Cube that lets you set its WiFi network connection detail
Select the WiFi network you want the mini Cube to connect to and give your password
The mini Cube will test this connection and finally glow green if it could successfully connect to the Internet or red if it failed to connect
Note #1: the mini Cube will not connect to WiFi networks that have a space in their name!
Note #2: the mini Cube is so small and compact that its WiFi antenna is also small and has reduced range. You need to be relatively close to your WiFi router for the mini Cube to reliably connect
Programming the mini Cube in UIFlow
You program the mini Cube exactly the same way as its big brother – there are just different blocks available to deal with this device’s slightly different hardware capabilities.
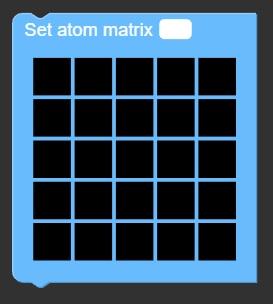
One of the cute new blocks available is the ‘set atom matrix’ block shown below. The 5×5 grid represents the LED pixels on the face of the mini Cube, and each pixel can be independently set to its own colour. First click the white rectangle to bring up a colour picker, then click all the grid elements that you want to have the corresponding pixel on the mini Cube glow in that colour. The featured image for this article shows a heart drawn using this technique. You might want to draw arrows or faces or letters and numbers. Simple!
Fun challenges with the mini Cube
- Try make a Digital Dice with the Cube. While the button is pressed, have a loop rapidly generate random numbers between 1 and 6, and as soon as the button is released, show the final number on the screen
- Build the Park Distance Controller project from the Applied Technology course using a ToF sensor and the mini Cube showing red and green when distances are ok/not ok.

")
 sensor Unit")


its a lot of info.
wow
Ohh!
nice one..
Cool stuff
wow
Wow