Alarm clock

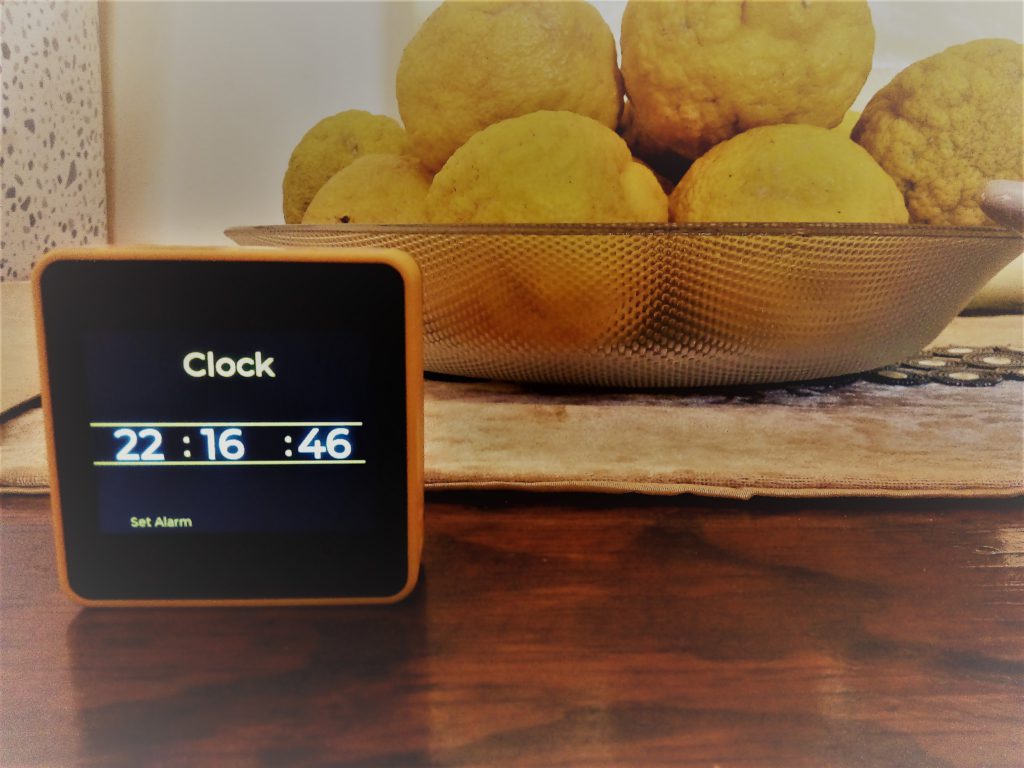
Your Cube is a great-looking, compact little device that’s packed with bunches of features. In this project we’re going to turn that little box of awesomeness into something you can use everyday – a bedside alarm clock!
The Cube has a chip inside it called a Real Time Clock (RTC) chip, which keeps track of time even while the Cube is off (so long as the battery is not completely flat!), so we’ll be using some of the UIFlow blocks to talk to this chip to get the current time, as well as set the time.
We’re also going to use the screen of the Cube to constantly show the time, as well as have a feature to set a time for the alarm using some touchscreen buttons (the more challenging part of this project!).
Finally we’re going to have the Cube flash, buzz, or play a sound when the alarm goes off. Of course you could do other stuff like turn a motor to feed your pet or turn your lights on/off, or pretty much anything else you can dream up.
Let’s get started!
How it works
Our program will have two main parts:
- the core loop which is a pretty simple infinite loop that just checks for whether the alarm should sound as well as updating the display with the current time or clock values
- a couple of functions and buttonpress listeners to handle user interaction in switching between screen modes, and editing the alarm
In this project we will have two screens – a Clock screen to show the current time and an Alarm screen to set and clear the alarm. We’ll make use of the touch buttons on the Cube to switch between these screens.
Unfortunately, UIFlow doesn’t (yet?) have a feature to allow you to design separate screens and switch between them. So our workaround will be to place all the graphical elements we need onto a single screen (and name them so we can keep track!), and create some of our own functions that we can call to hide and show just the labels and buttons that we want on each screen as we learned in the Applied Technology course.
Screen display
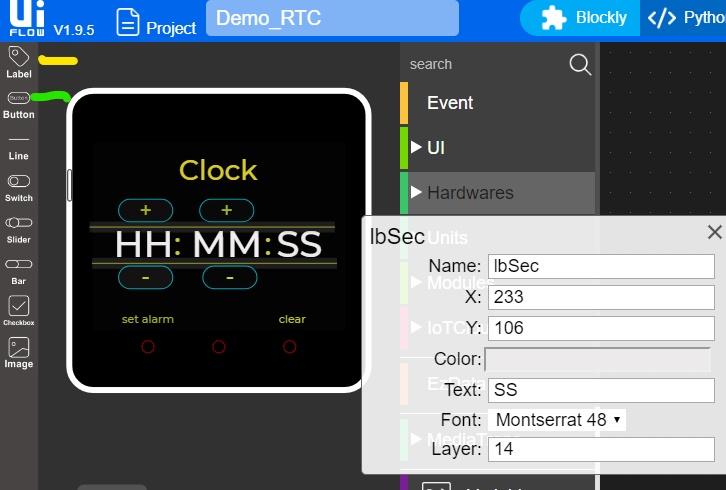
We going to start off by modifying our screen and adding all the labels and buttons on the screen that we’ll be needing. First, we need to drag 3 labels to the screen and place them next to each other, and if you left click on the first label we can add “HH” as a place holder and then adjust the name to “lbHour”. And if we click on our second label we will add “MM” as a place holder and adjust its name to “lbMin”. For the third label will add “SS” as a place holder and adjust the name to “lbSec” (This will make sure we don’t get confused later on when we select our label names on our blocks).
Now lets add 2 more labels between the “HH” and “MM” place holders, and the “MM” and “SS” place holders, then enter colons (:) as their place holders (This will separate the Hours from the Minutes and the Minutes from the Seconds)
Next, will add 3 more labels and adjust their place holders to “Clock” , “set alarm” and “Clear” (Drag and place this 3 labels according to how you see them on the screen). Now if we click on the clock label we can adjust the name to “lbMode”. For set alarm the label name will be “lbchangeMode”, and finally for the clear label name will type in “lbClear” (Again! naming the labels makes sure we don’t get confused when its time to select them on our blocks. Also we can adjust the font, color etc. of our labels as we wish).
Now lets drag and place our touch buttons on the screen. Will start by adding a button above the “Hour” label and if we click on it, we can adjust the “text” to a plus (+) symbol (Which will be the place holder for the button) then will adjust “Name” to “btnHourPlus”. Next, will place another button at the bottom of the “hour” label but this time adjust the “text” to a negative (-) symbol and the “Name” to “btnHourMinus”. Will do the same with the “Minute” label by placing a button above it and adjusting its “text” to positive (+) and its “Name” to “btnMinutePlus”.Let’s place another button at the bottom of the “Minute” label, adjust the “text” to negative (-) and the name to “btnMinuteMinus”. Note! that also on the buttons you may adjust the font, color, width and height as you wish (for creativity you may also add “lines” and adjust their color, X’s and Y’s as you see fit).
Let’s start coding
1st section
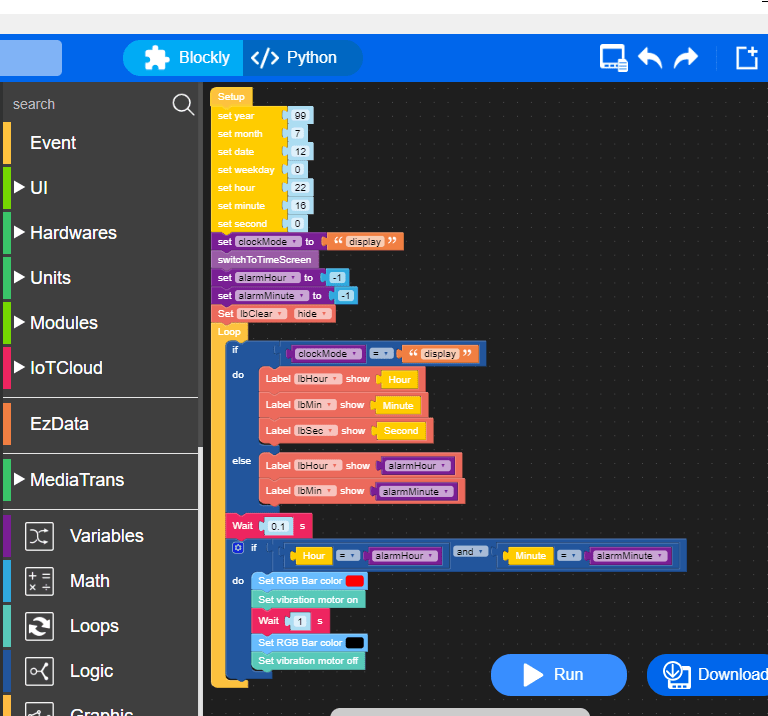
When we go to our side menu and click on the title “Hardwares”, will have our RTC blocks inside there. Now we can drag the “set year/month/date” etc block and place it under “setup” on our coding area. This block is a one-time program where you will be setting your year/month/time etc, and have it run at the correct time with the real time.

We need to store the alarm time somewhere so that the code is able to know what alarm time has been set. So to make things easier, will store the hours and minutes as separate variables.
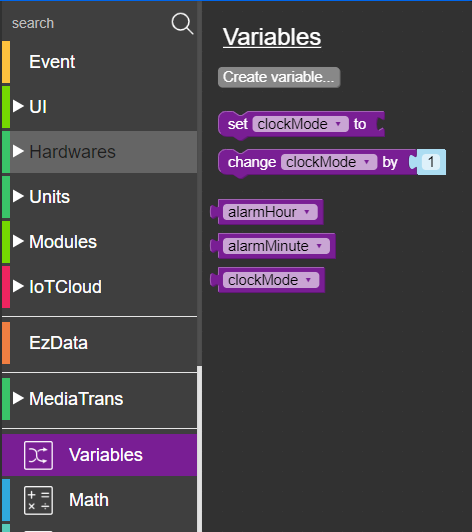
Now, will go to variables on our side menu then click “create variable” and create 3 variables called Alarmhour, AlarmMinute and Clockmode. Now that the variables have been created, will see a “set” block that has a drop down box (on the drop down box is where you will select any created variables) and now will drag the “set” block to our coding area, select “ClockMode” variable on the drop down box and then connect the “set” block with the “text” block (from “Text” section on the side menu), and inside the text block type in “display”.
Next, we going to place a “SwitchToTimeScreen” function block under the “set” block, and here is how we will create the function block – Click on “Functions” at the side menu and drag the first block (from top) to the coding area. Enter a new name for your function in the text box provided on the block (so for us the name will type in will be “SwitchToTimeScreen”).
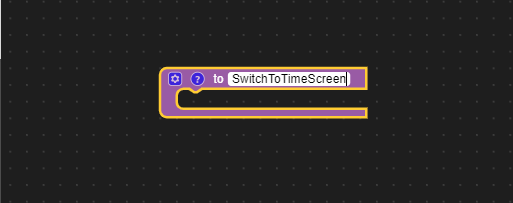
Note that when we add a function to the coding area a new block will appear in the functions blocks menu. We can add this block to other parts of our code and it will present whatever code is put inside the main function block.

Under the “SwitchToTimeScreen” function block will place 2 “set” variables blocks. On our first block will select “alarmHour” from the drop down box then drag a number block from “Math” (on the side menu), connect it with the variable block and set it to -1. Will do the same with the second “set” variable block, but this time on the drop down box will select “alarmMinute” and set it to -1. Now lets drag a “show/hide” label block from Ui label (on the side menu), place it under the prior block and then select “Clear” from the drop down and set it to “hide”.

Next, lets drag a Loop block from Events and place it under our previous block. Note! that the function of a Loop block is to executes the program contained in the block indefinitely (forever) until some event occurs to stop it.
So now, inside our Loop will start by placing an If-Else block. On the IF section of the block place a comparison block which will compare our “clockMode” variable with the “display” block. Following the do section of the If-Else block will place 3 labels for “lbHour”, “lbMin” and “lbSec” and then place the “Hour”, “Minute” and “Second” RTC blocks to the corresponding labels. On the Else section of our If-Else block will then place 2 more labels for “lbHour” and “lbMin”, and on our “lbHour” label block will show the “alarmHour” variable. On the “lbMin” label will then show the “alarmMinute” variable.
[So what is happening here is that If the “ClockMode” displays, the hour, minute and seconds real-time should also display. Or Else if the “ClockMode” is not displaying then only the “Hour” and “Minute” labels should display].
Under the If-Else block will place a wait a sec block from “Timer” (on the side menu) and set it so that the Loop wait for 0.1 seconds before triggering the next code.
Now, under the wait block will place the If Logic block from “Logic” (on the side menu). And on the If section will start by placing a And block (found in “Logic”) and then place 2 comparison blocks inside it which will start by comparing the “Hour” (RTC) with the “alarmHour” variable, then compare the “Minute” (RTC) with the “alarmMinute” variable.
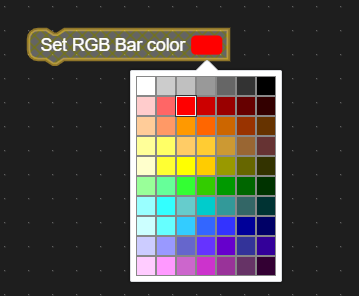
For the do section will start by goin to “Hardwares”(on the side menu) then by clicking on the “RGB” will see the “set RGB bar color” block. Now drag the block to the do section, and by clicking on the color box on the block you can select any color that you want your cube to flash.
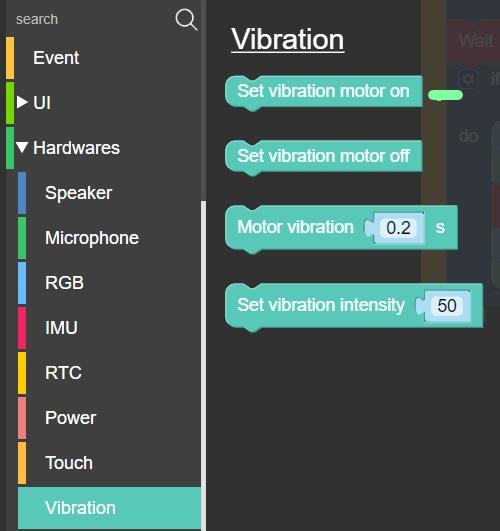
Next, let us go back to “Hardwares” and click on “Vibration”. Drag the “Vibration on” block and place it under our RGB block.
Using the “wait a sec” block, will set it to wait for 1 sec and then place the block under the “RGB” block.
Let’s go back and select the RGB block again, but this time change the color to black (so the cube turns the leds off) then place the block under the “wait a sec” block.
Go back to drag the “set Vibration” block and this time set it to “off”.
[So now what is going on here is that this is our Alarm Code. So if the “Hour” (RTC) block is equals to the “alarmHour” variable and the “Minute” (RTC) block is equal to the “alarmMinute” variable, flash the cube lights to red with the vibration on, wait for 1 second, then set the cube lights and the vibration off].
2nd section

A & C Buttons
From the “Event” (on the side menu) will drag 2 button blocks to the coding area. On the first block will select A and on the second block will select C from the drop down boxes on our blocks.
Now, the A button and the code (blocks) inside it represents the button under the “set alarm” label. And the C button with the code inside it represents the button under the “clear” label.
A
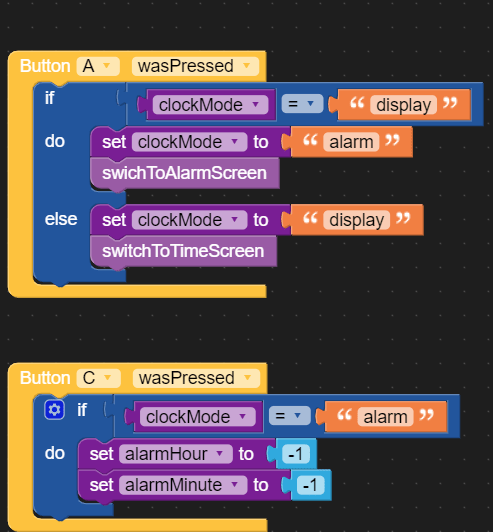
Inside the A button block will start by placing an If-Else block, and on the If section will start by placing a comparison block and compare the “clockMode” variable with the “display” block. Following the do section will place the “clockMode” variable block and set it to “alarm”, by joining it with the “alarm” text block. Then under place the “SwitchToAlarmScreen” function block (found in the functions on the side menu). On the Else section will set the “clockMode” to “display” and then “SwitchToTimeScreen”.
[So what is happening here is that, If the A button is pressed the first time, it will switch the screen to Alarm mode. And on the alarm mode when its pressed it will switch screen back to real-time (Clock mode].
C
Inside the C button will place the If statement block and on the If section will start by comparing the “clockMode” variable with the “alarm” text. And on the do section will place the “alarmHour” variable and set it to -1. Will do the same with the “alarmMinute” variable by setting it to -1.
[What is happening here is that, If the C button is pressed (in the alarm mode) will set both the “Hour” and the “Minute” units to -1].
Main Function blocks
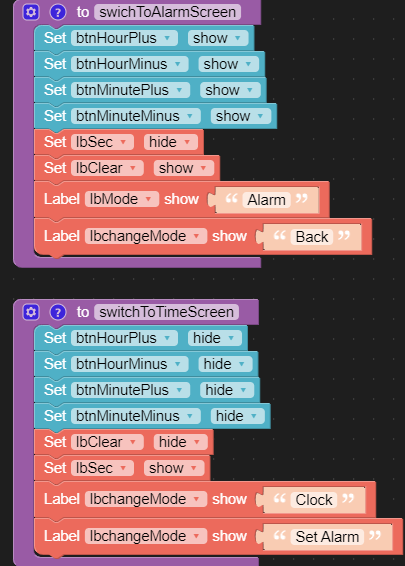
SwitchToTimeScreen
From the Ui will click on button then drag 4 “hide/show” button blocks and place them inside our function block. Now our “hide/show” button blocks has drop down boxes, so now will select all 4 plus and minus buttons for “HH” and “MM” inside the drop down boxes and set all to “hide” (this way the buttons won’t appear when the screen is switched to real-time mode).
Following in our main function block, will drag 2 “hide/show” label blocks (from Ui label) and place both under the prior block. On the first label block will select “lbClear” (from the drop down box) and then set it to “hide”. On our second label will select “lbSec” and set it to “show”.
Next, will need to show the “Clock” and the “set alarm” label when the screen is displaying real-time, so for that will drag 2 label blocks (from the Ui labels), place them under the prior block and on the first label block select “changeMode”(from the drop down box) and then where it says “show” will type in “Clock”. On our second label block will do the same by selecting “changeMode”(from the drop down) but this time where its says “show” will type “set alarm”.
SwitchToAlarmScreen
We going to create our second function block and name it “SwitchToAlarmScreen”. Now inside this function block similar with the “SwitchToTimeScreen” function block will place all 4 plus and minus buttons, but this time set all of them to “show” so that if the screen is switched to “Alarm” mode the buttons appear. Next will place 2 labels for “lbSec” and “lbClear”, set “lbSec” to hide and “lbClear” to show.
Will place 2 more labels for “lbMode” and “lbchangeMode. On the “lbMode” block type in “Alarm”(so that the title “Alarm” shows at the top of the screen when its switched to alarm mode). On the “lbchangeMode” label block will type in “Back”(so that the screen shows the “Back” label on top of the A button when the screen is switched to alarm mode).
Screen Buttons
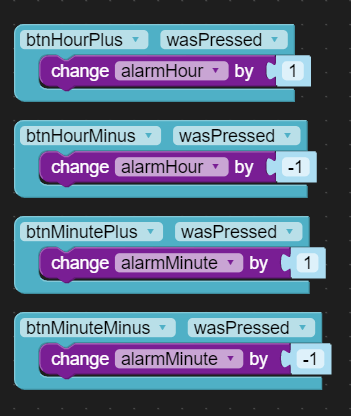
Now that we have placed 4 buttons on our screen, let us go to our Ui button section and choose the “was pressed” button block and drag 4 of those blocks to the coding area. On our first block from the drop down box, will start by selecting “btnHourPlus” then from our variables will drag the “change” block, select “alarmHour” variable (from the drop down) and change it by 1 (this will increase 1 unit on the hour every time you press the plus (+) button at the top of the hour label).
On our second button on the drop down box select “btnHourMinus”, place the “change” variable block inside button block and then change the “alarmHour” variable by -1 (this will then decrease 1 unit from the hour each time you press the minus (-) button at the bottom of the hour label). And now we can repeat the same process for the “btnMinutePlus” and “btnMinuteMinus” buttons.
Finally! now that we are all set, you can run your code and enjoy your Alarm clock.
Next steps
So our alarm clock is done and is pretty useful! The Cube has magnets that let it stick to anything metal – so you could, for example, mount it to your fridge and set an alarm for when your eggs have finished cooking!
But there are lots of ways of extending this basic alarm clock with features that are useful to you. Maybe you can use the tilt sensor or accelerometers (under the IMU blocks) to turn off the alarm when the Cube gets tilted or bumped; or perhaps display a different timezone when the Cube is placed sideways or upside-down!
Or maybe have the Cube interact with the real-world using a motor to lock/unlock a door at a specific time; or turn your houselights on/off; or feed your pets!
As always, be sure to upload pictures of your alarm clock to the EduPortal for the rest of us to ooh and aah at!
")
")

 sensor Unit")

Responses