Hello! Thank you for purchasing our product, and welcome to our community!
This guide is intended to help you get up and running with your shiny new equipment.
If you get stuck at any point, feel free to post a question in the tech support forum at or message @JohnS inside the portal.
Lets jump in!
CanDo creator kit contents
The CanDo creator kit is a set of sensors and an awesome little CanDo Cube. The Cube works like a little miniature computer, and is programmed by you, the user, and together with the sensors in the kit can be used to build a whole bunch of real-world technology solutions ranging from a alarm clock to a robot that plays games on your physical computer! We teach you all this from zero-to-hero in the Applied Technology course for which this kit is a pre-requisite.
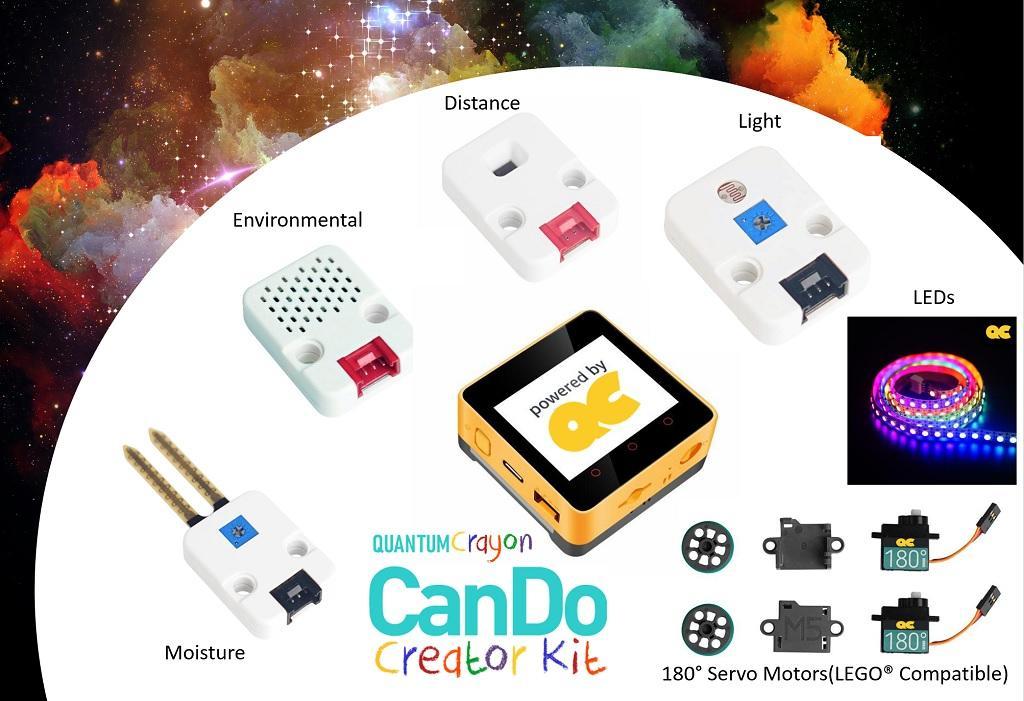
Your CanDo creator kit should be a plastic container that includes the following items:
- 1x CanDo Cube. This is the ‘brains’ of the kit and the thing you will write software programs for to make it do interesting and useful things. CanDo Cube is QuantumCrayon’s branding of the device – under the hood it is an M5stack Core2 AWS device – should you need to google extra technical details or support.
- 1x Light sensor. This sensor can measure how much light is in an area
- 1x Distance sensor. This is rather cryptically labelled as ToF which is short for Time of Flight, and uses a narrow beam of invisible infrared light to measure the distance of things reflecting the light within roughly 2 metres.
- 1x combination Temperature/Pressure/Humidity environmental sensor. This is labelled as ENV-I, or ENV-II or ENV-III depending on when you purchased the kit and what generation of sensor was in use at the time
- 1x Soil moisture sensor. This is labelled EARTH
- 1x 180 degree Servo motor kit. There are two motors included, as well as some LEGO® compatible connectors to make it easy to use the motors with any LEGO® you might have. Note that the motor kit includes some yellow/red/brown extension cables, but that you will also use one of the little red/black/yellow/blue connector cables from the other sensors to connect each motor to your Cube.
- 1x light strip. There are 15 little lights on the strip (technically the lights are known as Light Emitting Diodes or LED for short), with each individual light being able to be independently set any of 16 million colours!
Each item in the kit has a unique serial number on its box, so be sure to keep the boxes if ever the item breaks and you need to replace it under warranty.
Speaking of warranties, the Cube carries a 12 month warranty, with the other elements of the kit covered for 6 months each due to the way in which sensors are normally used. If you suspect an element of the kit is defective you can contact us in the tech support forum to try fix it remotely, otherwise you can ship it back to us at your own cost and we will ship you the repaired or a replacement item at our cost. Please note that the warranty applies individually to each item in the kit – please do not ship us your entire kit if only one of the sensors is defective!
Programming software
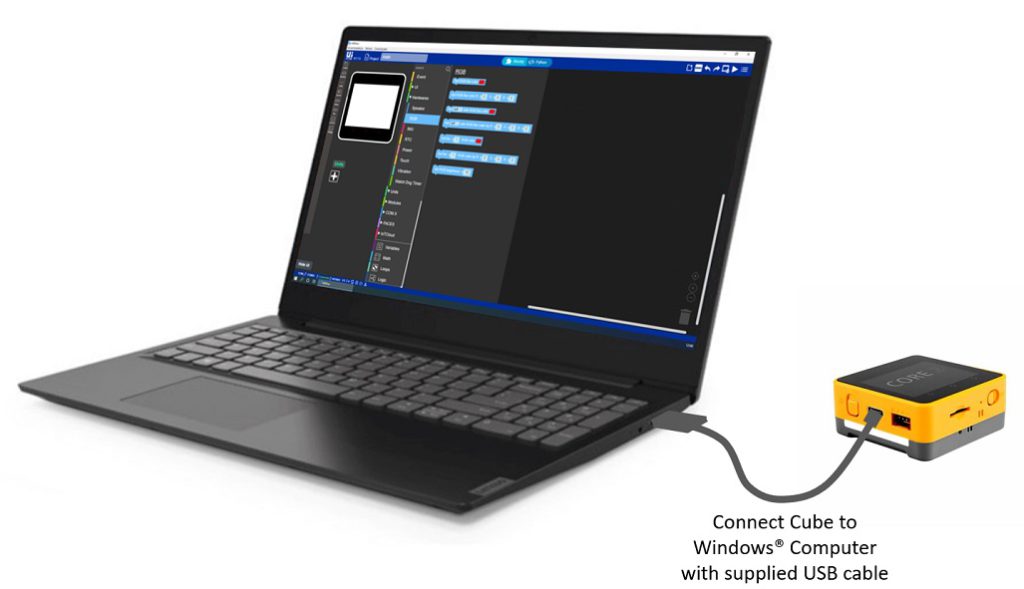
To write your own programs for the CanDo cube and to complete the Applied Technology course, you will connect your Cube to a USB port on your computer using the little black USB cable supplied with the Cube and use the UIFlow programming software to create new software programs and send them to the Cube.
The UIFlow software only runs on Windows computers at this time, and can be freely downloaded from the Course Materials section of the Applied Technology course. There is unfortunately no support for MacOS devices – although we are developing our own software to enable this in future.
There is a video explaining how to download, unzip and install the UIFlow programming software under the topic Downloading and installing the UIFlow app in Lesson 2 of the course (Setting ourselves up and writing our first program!).
In essence the process involves downloading a compressed file about 100MB in size to your computer. Extracting the contents of the file – in the course video we show how to do this to your Windows desktop – and then launching the app. There’s one final step before you can program your Cube though – you need to install the drivers that let Windows talk to your Cube over the USB port (more technically the drivers enable Windows to allocate your Cube a COM (short for communications) port over which serial data will be sent).
First steps with the Cube
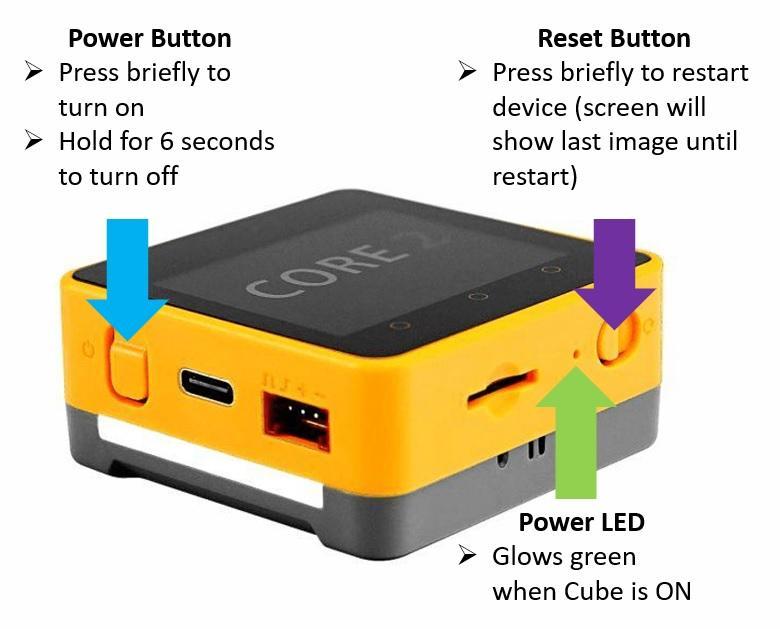
The Cube has two hardware buttons – one on the left-hand side right next to the USB port. Press this briefly to turn the Cube on. It takes about five seconds for the Cube to turn on and the initial menu screen to show. About a second or so after you press the power button, there is a little green LED on the bottom edge of the Cube between the SD Card slot and Reset button that will show you if the Cube is on before the screen gets initialized.
To turn the Cube off, you press and hold the power button for six seconds.
The reset button on the bottom edge of the Cube is used to restart the Cube. When you press reset it can seem confusing that the does not instantly reset as one might expect – it keeps showing the last image for about 5 seconds until the Cube restarts and re-initializes the screen as explained in the course video.
There are three touch sensitive buttons on the bottom edge of the Cube’s screen, highlighted with little orange circles. These buttons are programmed by you, the user, and are not active in the Cube’s default menu.
As explained further in the Hardware Overview course video, straight out the box the Cube will present you with a screen showing three options. From left to right they are: select an app to run, enter programming mode, change Cube settings.
What’s important to know is that if you select an app to run or you enter programming mode, the Cube will remember that setting and enter it automatically every time it reboots! This makes it convenient when programming the cube or deploying it permanently somewhere. If you want to ever get back to that initial screen and change modes, the Cube does briefly show you this menu every time it reboots, so you need to very quickly select a different menu option before it automatically enters into the last mode it was in. Its very easy to miss the window of choosing a new menu option, so if you do – no problem – push the reset button to force the Cube to reboot and try again!
Advanced steps with the Cube
Under the hood, the CanDo Cube is powered by the hugely popular Espressif ESP32 mictroncontroller. As such, if you outgrow the world of UIFlow and creating programs graphically, then it is entirely possible to reprogram (technically ‘reflash’) the Cube so that you can program it using lower-level and more advanced coding techniques such as via C/C++ in the Arduino IDE or Micropython. We’ll be developing some guides on this in the future once, so ping us via the support forum or message us on the portal if you’ve not found it.
A bit about the EduPortal
The QuantumCrayon EduPortal is the site that you are currently on while reading this getting started guide. There are menu items that let you move around the important parts of the site, including:
News – Here we post announcements from us as well as interesting news related to the Fourth Industrial Revolution that we are in the early stages of.
Learn – Here you can browse, enrol, and progress in the courses we have on offer. We also post new projects under the Learn section from time to time
Connect – Here you can interact with other members of our community including public forums and class groups, browsing community-submitted projects, and the sitewide points leaderboard
Profile – Here you can manage your privacy settings and how you appear to other members of the community. You can also directly message other community members here, as well as manage your own public blog post and project posts.
Thanks and enjoy!
If you’re reading this having just received your CanDo Creator’s Kit, then your next step is to probably get started with the Applied Technology course and start your journey!
Again, thank you for your purchase and we look forward to the awesome stuff that you will create and share with our community!
– The QuantumCrayon Team –